Showing posts sorted by relevance for query Michael Gardi. Sort by date Show all posts

Sunday, February 07, 2021

Re-creating a 1960s "Computerized" Trivia Game - Updated

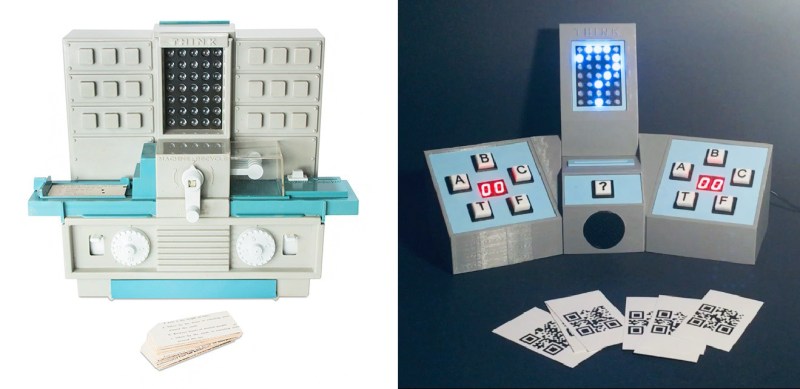
I've posted several times about the re-creations of 1960s computer toys and educational games that my talented cousin, Michael Gardi, has been producing over the last few years. He has a new project, an updated version of Hasbro's Think-a-Tron, a "computerized" trivia game I put "computerized" in quotes because, as you'll see from Michael's article, it was not computerized at all, but just made to look like one. 

Ok, my elevator pitch for this project is just a "bit" overstated, but so was the marketing for Think-a-Tron, "the machine that thinks like a man". While some toys of the same era, like the Digi-Comp I for instance, endeavored to teach people about computers, Think-a-Tron took advantage of the growing interest in computers to sell a cleverly packaged trivia game. In fact, if there is any "claim to fame" attached to Think-a-Tron, it's that it introduced the trivia game concept 21 years before Trivial Pursuit.

My goal for this project is to honor Think-a-Tron, not to reproduce it. I want to build something that is clearly a Think-a-Tron derivative, but utilizes modern fabrication techniques and components. At the same time I would like to maintain the 60s mainframe vibe of the original. As always I want to have some fun along the way.

 Hackaday has this to say about it.

In an effort to right past wrongs, [Michael Gardi] rebuilt the 1960s “thinking machine” toy with modern components. The original may not have lived up to the hype, but at least did a decent job of evoking the room-filling computers of the day is a plastic cabinet with a dot-matrix-like display. The toy uses “punch-cards” with printed trivia questions that are inserted into the machine to be answered. A disk with punched holes spins between a light bulb and the display lenses, while a clever linkage mechanism reads the position of a notch in the edge of the card and stops the wheel to display the letter of the correct answer.

[Michael]’s update to the Think-aTron incorporates what would have qualified as extraterrestrial technology had it appeared in the 1960s. A 35-LED matrix with a 3D-printed diffuser and case form the display, with trivia questions and their answer as a QR code standing in for the punch-cards.He also added a pair of user consoles, so players can lock-in and answer before an ESP32-Cam reads the QR code and displays the answer on the LED matrix, after playing some suitable “thinking music” through a speaker.

 Update: Mike has created a follow-up project, the Think-a-Tron Mini.


Thursday, September 03, 2020

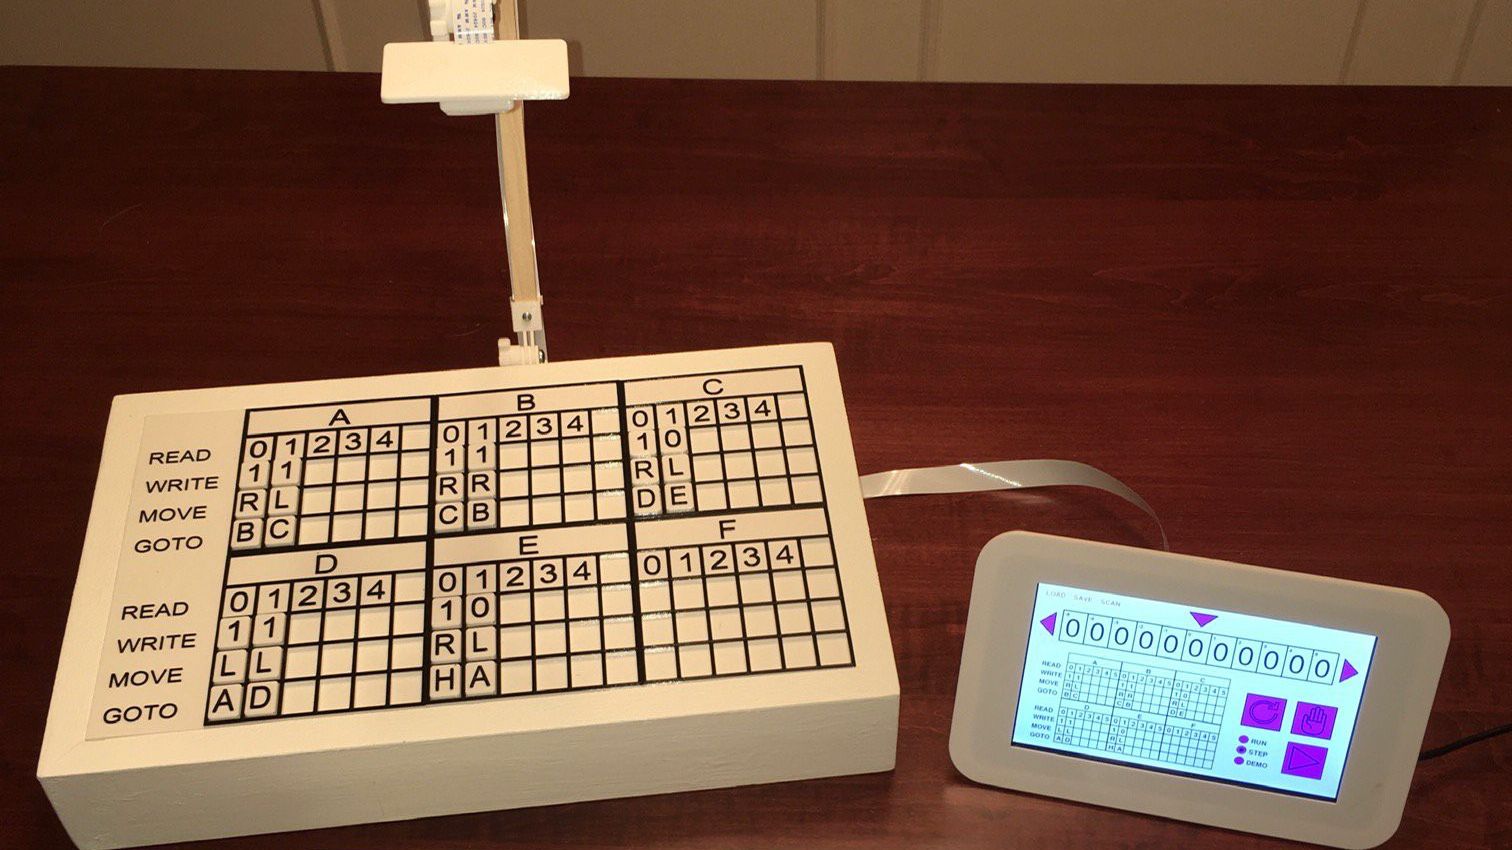
Build Your Own Turing Machine

I've posted here before about some of the projects my talented cousin, Michael Gardi, has been developing. His latest is a bit of a departure from his previous recreations of classic 60s educational computing toys. It's a Turing Machine demonstrator.  

For something that has been around since the 1930s and is so foundational to computer science, you’d think that the Turing machine, an abstraction for mechanical computation, would be easily understood. Making the abstract concepts easy to understand is what this Turing machine demonstrator aims to do.

The TMD-1 is a project that’s something of a departure from [Michael Gardi]’s usual fare, which has mostly been carefully crafted recreations of artifacts from the early days of computer history, like the Minivac 601  trainer and the DEC H-500 computer lab. The TMD-1 is, rather, a device that makes the principles of a Turing machine more concrete. To represent the concept of the “tape”, [Mike] used eight servo-controlled flip tiles. The “head” of the machine conceptually moves along the tape, its current position indicated by a lighted arrow while reading the status of the cell above it by polling the position of the servo.

Mike goes into more detail about his design choices in his Hackaday project site. Here'a a bit of it.

One might think having an eight cell "input area" would  limit the tasks TMD-1 could perform.  In actual fact I could not find any interesting programs that could not be run in eight or less cells on an unbounded tape. What does interesting mean? Well the program would have to do something non-trivial (something more than writing a single symbol to the tape) and then stop. Stopping is important because there is nothing interesting about a program wondering down a tape to infinity (at least after the first millennia or so). 

To  be brutally honest, there is only one program that runs on on a 3-symbol / 3-state Turing machine that is truly interesting, the "busy beaver".  The busy beaver "game" consists of designing a halting, binary-alphabet Turing machine which writes the most 1s on the tape, using only a given set of states, in this case 3-states. By definition a busy beaver program running on TMD-1 is prohibited from using the endmarker symbol. I won't spoil the ending but this program runs fine in eight cells.

In actual fact implementing TMD-1 as an Linear Bounded Automata makes it a lot more interesting and fun. Being able to determine the beginning and end of the input area is key. With this little LBA we will be able to:

  • Treating the input area as a binary number find the one's compliment. (Making the input/tape alphabet 0 and 1 was not by accident in this case, although by convention this is often the case. )
  • Find the two's compliment of the "binary" number in the input area.
  • Count in binary (ascending and descending).
  • Sorting. Move all the 1's in the input area to the right or left.
  • Shift the input area one cell to the right or left (multiply / divide by 2).
  • Cylon eye with head lamps ;-)

You get the idea. As an LBA the Turing Machine Demonstrator is a much more capable teaching tool even with only eight cells for the input area.

He has more detailed instructions, including a parts list and the files needed for 3D printing, on the Instructables site.


Tuesday, December 01, 2020

A Bigger, Better Turing Machine You Can Make

I posted a while back about my cousin, Mike Gardi, who built a demonstration Turing Machine. After receiving some feedback on the original product, he's now created a bigger, better, and more collaborative Turing Machine, described here on the Hackaday site.  

This collegial dynamic is very much on display with TMD-2, [Michael Gardi]’s latest iteration of his Turing machine demonstrator. We covered the original TMD-1 back in late summer, the idea of which was to serve as a physical embodiment of the Turing machine concept. Briefly, the TMD-1 represented the key “tape and head” concepts of the Turing machine with a console of servo-controlled flip tiles, the state of which was controlled by a three-state, three-symbol finite state machine.

TMD-1 was capable of simple programs that really demonstrated the principles of Turing machines, and it really seemed to catch on with readers. Based on the comments of one reader, [Newspaperman5], [Mike] started thinking bigger and better for TMD-2. He expanded the finite state machine to six states and six symbols, which meant coming up with something more scalable than the Hall-effect sensors and magnetic tiles of TMD-1.

[Mike] opted for optical character recognition using a Raspberry Pi cam along with Open CV and the Tesseract OCR engine. The original servo-driven tape didn’t scale well either, so that was replaced by a virtual tape displayed on a 7″ LCD display. The best part of the original, the tile-based FSM, was expanded but kept that tactile programming experience.


If you want to find out more about the TMD-2, check out Mike's post on the Hackaday blog. For instructions on how to make the TMD-2, see his article on the Instructable site. Mike has included a quick start guide and an app that you can use to learn the principles of Turning machines. 

With the application running I highly recommend that you work through the TMD-2 Quick Start Guide that is attached to this Instructable. The first part will tell you how the TMD-2 application works, followed by an exercise that will teach you how a Turing machine works. At the end are some additional challenges for those that want to learn more.

Tuesday, August 03, 2021

Recreating Vintage Computer Toys

I've posted here before about my cousin, Michael Gardi, who has used his time in retirement to recreate several vintage computer toys from the dawn in the computing era.

Mike has been interviewed by Mark Fraunfelder, editor at Boing Boing and co-host of the Cool Tools podcast with Kevin Kelly, for his new newsletter The Magnet.

It's an interesting interview and shows the value of parents giving their kids toys that are both fun to play with and make them think. 

Mark: Why are you interested in recreating classic computer-like educational devices and toys?

Michael: In 1965, I was 12 years old. And I got the Digi-Comp I from my parents as a Christmas present. And it was pretty much a perfect gift for a kid interested in computers, where computers of the day were mysterious and cost millions of dollars and lived in big rooms. It was a great gift. And I learned Boolean logic, and octal and hex notation systems, and a little bit of logical thinking. I'm not saying that was the only reason I ended up studying computer science and having a nice career writing software, but it was certainly a contributing factor.

Monday, June 29, 2020

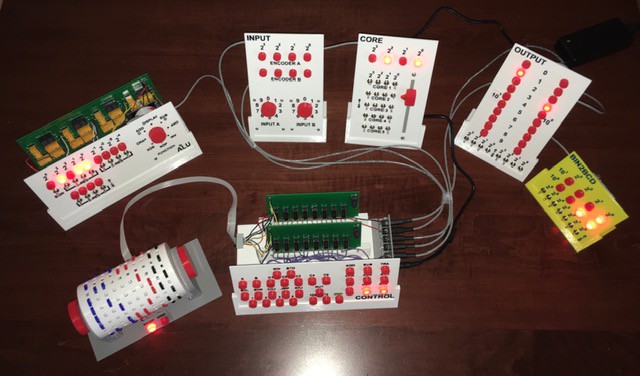
DEC H-500 Computer Lab Reproduction

My cousin, Michael Gardi, has been busy since retiring, producing reproductions of educational computing devices from the 1960s. I've previously posted here (and here) about some of his projects. 

He has just completed a new one – a reproduction of the DEC H-500 Computer Lab. 
Many people reading this will be familiar with the Digital Equipment Corporation (DEC) lines of PDP machines. I would guess though that far fewer have encountered the H-500 Computer Lab. Launched in the late 60's the H-500 was part of a COMPUTER LAB curriculum to introduce students and engineers to digital electronics. It's not surprising that DEC would undertake this since more than half of it's PDP machines at the time were installed in educational institutions.

The machine itself shipped with a wonderful workbook that contained a complete course in digital electronics. Together the COMPUTER LAB package was intended to accompany courses in binary arithmetic, Boolean algebra, digital logic or computer technology. While not a true computer, the H-500 could be "wired" to perform many of the underlying operations of a true computer using a point-to-point patch cord mechanism.
 
Building this is not for the fainthearted; you'll need access to a 3D printer and some basic carpentry and electronic skill. (Mike is far beyond me in both those areas). It would be a wonderful project for a high school computing class. 

There's also an article about it on Hackaday.

Wednesday, March 10, 2021

Building a 2:3 Scale VT100 Reproduction

It's likely that if you are a few years younger than me, your first computer experience was on a VT100 terminal hooked up to a DEC minicomputer. My talented cousin, Michael Gardi, falls into that category and has created a 2:3 scale VT100 terminal to go with a PDP-8 emulation kit that he purchased. 

I've been building Oscarv's (https://hackaday.io/obsolescence) wonderful PiDP-8/I (https://hackaday.io/project/4434-pidp-8i) kit. While I was sorting parts and installing software I started thinking about how I was going to access my "new" machine. Now I know that I can just SSH, telnet, or VNC into the Raspberry Pi running the show but where's the fun in that. It makes me sad now that I eventually got rid of all the serial terminals I had lying around (mostly Volker-Craig models since I live in Waterloo) because that would have been a great way to demo the 8I. When I went online looking for a vintage terminal I got a severe case of sticker shock. So I decided to do what I do and make a "front end" terminal reproduction for my soon to be completed PiDP-8/I.

It looks good and I'm looking forward to seeing it when I visit Mike, hopefully later this summer, when it's safe to travel again.  


Thursday, June 03, 2021

Reproducing One of the First Personal Computers

If you're of a certain age, and have a technical bent, you may remember the KENBAK-1, arguably the first commercial personal computer. My talented cousin, Michael Gardi, has added a 2:5 scale reproduction of the KENBAK-1 to his stable of early computer reproductions. 

On his article on the Hackaday site, he says:

So with all of this rightly deserved KENBAK-1 love out there, why am I creating yet another KENBAK-1 emulator?  The flip answer might be that I want to and I can, but that's not all of it. While all of the wonderful reproductions out there emulate the original to a tee and give a true KENBAK-1 experience, and even have some addition features like built in programs, at the end of the day you are still in many cases hand translating machine instructions and keying them in via the front panel buttons one step at a time.  And when something goes wrong, while you can step through your program one instruction at a time you only have visibility into one thing at a time on the front panel display, the instruction or a memory/register address. It gets old pretty fast. 

Where I think I can add some value is to integrate the machine code Emulator with an Assembler and a Debugger.  You will still be able to fire up my KENBAK-2/5 console to key and run your programs in native mode via the front panel. In addition you will be able to open an integrated development environment, enter in a KENBAK-1 program via assembly language and run said program using the actual console.  Similarly you will be able to step through your assembly code, set break points, and observe memory and register contents as you do. 

My other motivation for this project is that I really wanted to do a deep dive on this machine. When I looked at the Programming Reference Manual I was very impressed with the machine architecture and the instruction set. I mean an Indirect Indexed addressing mode on a machine built with logic chips. So cool.  

Thursday, February 06, 2020

Building a 1967 Paperclip Computer

My cousin, Michael Gardi, has a hobby of recreating digital computing educational toys from the 1960s. He's produced several so far; see this blog post for a summary.

He has a new project, a recreation of the WDC-1 computer based on the book "How to Build a Working Digital Computer" by Edward Alcosser, James P. Phillips, and Allen M. Wolk. It's sometimes known as the "paperclip computer" book, as they used paperclips for the switches.

Mike says:
There have been a few implementations based on the book over the years. A couple are pictured above. This project will document my efforts to make my own version of a "Working Digital Computer" henceforth to be called WDC-1. My intent is to use period technologies but modern building techniques like 3D printing and PCB fabrication. I will probably not use paperclips for switches.
He's completed the project and this is what it looks like.

This is a cool project and I'm looking forward to seeing it the next time I visit Mike. If you want to try it yourself, details are in his Hackaday article.


Wednesday, December 04, 2019

Recreating Early Educational Computing Devices

Back in June I posted about a replica of the Minivac 601, a 1960s toy intended to teach digital circuit design, that was produced by my awesomely talented cousin, Michael Gardi.

Mike has been busy since then and has come up with more replicas of these early devices.

First here's a 3D printed replica of the Digi-Comp II marble computer. "Intended as an aid for teaching computer concepts, the Digi-Comp II can count, perform basic arithmetic, and obtain either the "1's" or '2's" complement of a number. The device can be run in auto mode where the balls are released automatically after each step of an operation until the operation is complete, or in manual mode where the user initiates each step."


Then there's the GENIAC (Electric Brain) Replica. "GENIAC, which stood for "GENIus Almost-automatic Computer", was an educational toy billed as a "computer" sold from 1955 through the sixties for about $20. Designed and marketed by Edmund C. Berkeley, with Oliver Garfield, it was widely advertised in science and electronics magazines. GENIAC provided many youths of the day with their first exposure to computer concepts and Boolean logic."


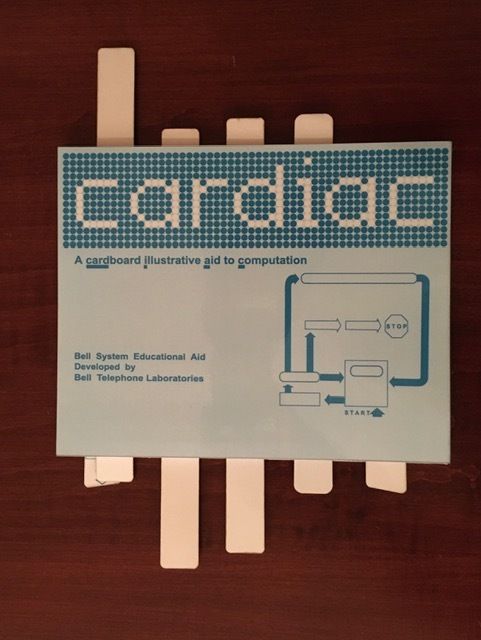
And then there's the CARDIAC (CARDboard Illustrative Aid to Computation) Replica. "The CARDIAC Instructable presented here is not a computer, it's a  device to help you understand how a computer works. You the user will: decode instructions by sliding panels up and down, move the program counter "lady bug" from one memory location to the next, perform the duties of an arithmetic logic unit (ALU), read inputs from one sliding strip, and write output results to another (with a pencil). Along the way you will you will learn the internal workings of a typical Von Neumann architecture computer. Some fairly sophisticated programs can be executed (by you manually remember) on the CARDIAC. Stacks, subroutines, recursion, and bootstrapping for example can all be demonstrated."


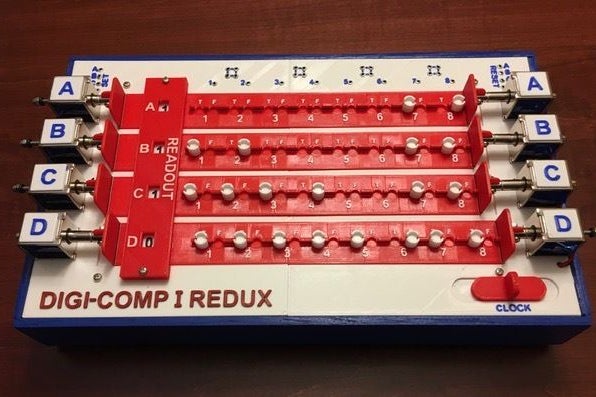
Finally, here's his latest and likely most sophisticated project, the Digi-Comp 1 Redux. He says:
Today's Instructable is a little different. It's a brand new machine that is a "mashup" of the following classics: 
  • Digi-Comp I: My new design is mostly based on the mechanics and "programming model" from this machine.
  • Digi-Comp II: The look and feel of the new machine came from both my Digi-Comp II replica and the Digi-Comp I.
  • Minivac 601: From the Minivac 601 I used the old telephone switchboard patch cord mechanism to connect the solenoids to the proper logic elements.
  • GENIAC Redux: The GENIAC Redux replica used magnetic reed switches and magnets to implement the logic elements. My new design follows suit.
I wanted my new machine to have the wonderful ascetic of these vintage models that I know and love. I want people to believe that it could in fact have been from the 50's or 60's. However since it is not a replica I didn't feel compelled to limit myself to the technologies of the era. What does this mean? Read on and find out. 
If you want to try building one of these, you will need a 3D printer and a moderate amount of mechanical ability and tools. They would probably be ideal projects for a high school computing class or computer group.

Wednesday, June 19, 2019

Minivac 601 Replica

The Minivac 601 was an educational toy designed to teach digitial circuit design. It was developed by information science pioneer, Claude Shannon.


Now, courtesy of Michael Gardi (who happens to be my awesomely talent cousin), you can build your own replica.
The Instructable presented here is for a full size replica of that Minivac 601 from 1961. I have tried to remain as true to the original as possible given the technologies and resources available to me. I don't have a "vintage" unit so this replica has been constructed based on photos and from the original manuals that were available online. I have included these manuals in PDF format as part of this project. I brought these files to a local copy center and had them printed as the spiral bound booklets you can see above. I'm really happy with the results.